

How to Remove Oil Stains from a Concrete Driveway
Table of Contents
- What You’ll Need Before You Start
- Step 1: Identify the Stain and Prepare the Surface
- Step 2: Try Household Remedies for Oil Stains
- Step 3: Apply the Best Concrete Degreaser for Driveways
- Step 4: Pressure Washing Concrete Driveway Oil Stains
- Step 5: Seal the Concrete to Prevent Future Stains
- When to Hire Professional Pressure Washing Services
- Common Mistakes to Avoid
- Frequently Asked Questions
Last Updated: September 28, 2026
What You’ll Need Before You Start
Removing oil stains concrete driveway surfaces leave behind is easier with the right supplies. Concrete is porous, so oil sinks in fast and sets within hours, acting quickly matters more than buying expensive products.
Here is what to have ready:
- Rubber gloves and eye protection
- Kitty litter or baking soda
- Liquid dish soap and laundry detergent
- A stiff bristle brush
- A bucket and garden hose
- Concrete degreaser
- A pressure washer (optional)
- Concrete sealer
Cornstarch works just as well as kitty litter for fresh spills. Most people have it in the pantry already.
Step 1: Identify the Stain and Prepare the Surface
Before you touch the stain, figure out what you are fighting. Motor oil, synthetic oil, brake fluid, transmission fluid, and hydraulic fluid each behave differently, and the wrong method can set a stain permanently or spread it.
Match the Method to the Fluid Type
| Fluid Type | What It Looks Like | Why It Behaves That Way | Best First Move |
|---|---|---|---|
| Conventional motor oil | Dark brown to black, soft edges, oily sheen when fresh | Heavy hydrocarbons sit near the surface and absorb slowly | Absorbent powder first, then dish soap paste |
| Synthetic oil | Thin, gray-black, spreads wider than you expect | Smaller molecules penetrate faster and deeper into pores | Solvent-based degreaser with extended dwell time |
| Brake fluid | Amber to clear, often with a faint chemical smell | Glycol-based; it pulls moisture and can etch or discolor concrete | Flush with water fast, then water-based degreaser, avoid solvent on fresh brake fluid |
| Transmission fluid | Distinct red or reddish-brown tint | Dye and additive package can leave a permanent tint even after the oil is gone | Degreaser plus repeat absorbent cycles; expect some residual color |
| Hydraulic fluid | Yellow to amber, thin, spreads quickly | Low viscosity means it wicks outward and downward fast | Absorbent immediately, then solvent degreaser |
| Grease | Thick, tacky, holds shape | High viscosity keeps it on top but it smears when scrubbed | Scrape off the bulk first, then degreaser |
If you cannot tell what leaked, assume synthetic, the hardest common case, and the method that works on it also works on conventional oil.
Fresh vs. Set-In: The Timing Test
A fresh stain looks wet and dark; a set-in stain looks dry, gray-black, and faded at the edges. The practical test: press a clean white paper towel onto the stain. If oil transfers, absorbents will do most of the work. If the towel comes up clean but the stain is still dark, the oil has soaked into the pores and you need a chemical degreaser with real dwell time.
Read the Severity Before You Choose a Method
Use this quick decision path:
- Light sheen, no color depth → absorbent powder, then dish soap. Done in under an hour.
- Dark stain, paper towel test positive → absorbent powder, then degreaser. Half a day.
- Dark stain, paper towel test negative, less than a year old → solvent degreaser, extended dwell, stiff brush, possibly two rounds.
- Decades-old stain or one that keeps returning after cleaning → poultice method (see below) or professional service.
- Stain larger than a few square feet, or multiple overlapping stains → treat as a professional job; DIY results are usually uneven.
The Poultice Method for Deep-Set Stains
For oil fully cured into the slab, a poultice pulls it back out. Mix an absorbent powder, diatomaceous earth, fuller’s earth, or finely ground kitty litter, with enough solvent degreaser to make a thick paste. Spread it a quarter-inch thick, cover with plastic wrap, tape the edges, and let it sit 24 hours.
Clearing and Prepping the Surface
Good surface prep makes every later step work better. Sweep away dirt, leaves, and grit. If the stain sits near a garage or gutter, block the runoff path with sandbags or towels to keep oil out of storm drains, which most states regulate under clean water rules.
- Move vehicles and toys off the slab
- Sweep the whole area, not just the stain
- Check the weather: pick a dry, mild day with no rain in the forecast for 24 hours
- Test any cleaner on a hidden spot first, especially on colored or stamped concrete
- Note the ambient temperature; most degreasers lose effectiveness below about 50°F
EPA guidance on stormwater runoff and pollution
Step 2: Try Household Remedies for Oil Stains
Household remedies handle most fresh stains and many light set-in ones. Start here before buying a heavy-duty degreaser. You will save money and avoid harsh fumes.
Baking Soda and Kitty Litter Absorbents
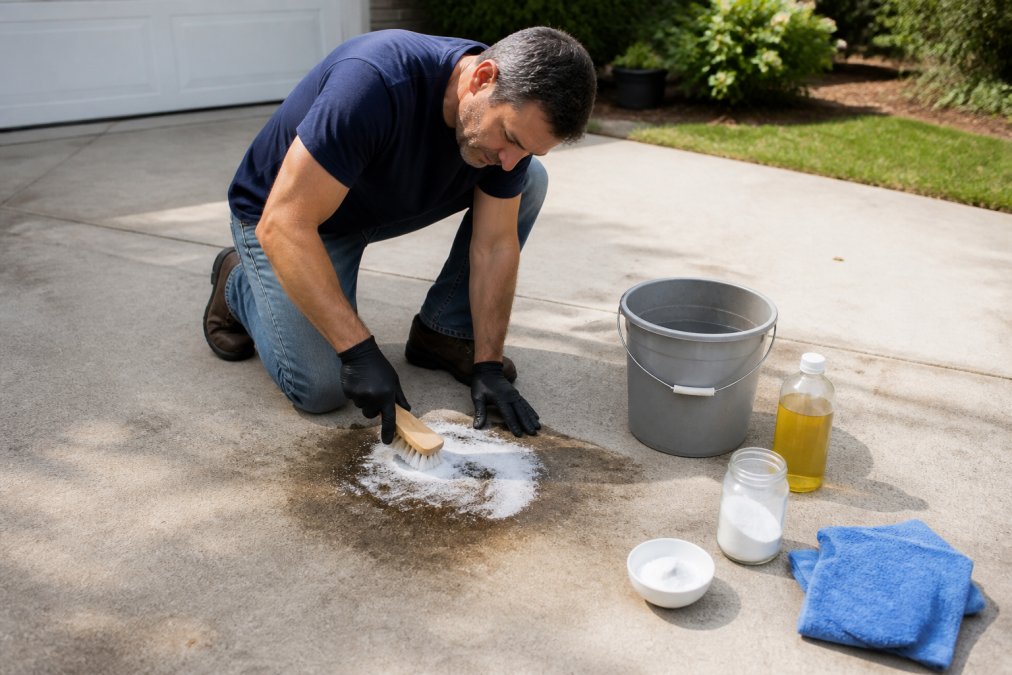
Baking soda and kitty litter pull oil up out of the concrete. Cover the stain with a thick layer, press it in with your shoe, let it sit several hours, then sweep it up. Repeat until the powder stops turning dark. On fresh spills, this alone can remove most of the oil.
Dish Soap and Laundry Detergent Pastes
Mix liquid dish soap or laundry detergent with warm water to a paste. Spread it over the stain, let it dwell 15 to 30 minutes, scrub with a stiff bristle brush in circles, then rinse well and check the results.
Never mix bleach with ammonia-based cleaners. The chemical reaction creates toxic fumes that can send you to the hospital.
Step 3: Apply the Best Concrete Degreaser for Driveways
When household methods fall short, a dedicated degreaser is the best concrete degreaser for driveways with heavy or old stains. These products break down grease at the molecular level so water rinses it away.
Choosing Between Solvent-Based and Water-Based Degreasers
Water-based degreasers are safer for plants and pets and work well on fresh stains and light grease. Solvent-based degreasers cut deeper into porous surface and handle brake fluid, transmission fluid, and other automotive fluid. Pick solvent-based for old, dark stains; water-based for routine upkeep.
| Degreaser Type | Best For | Dwell Time | Safety Notes |
|---|---|---|---|
| Water-based | Fresh stains, light grease | 10-20 min | Pet and plant friendly |
| Solvent-based | Old, deep-set stains | 20-45 min | Ventilate, wear gloves |
| Citrus-based | Everyday spot treatment | 15-30 min | Mild odor, slower acting |
Dwell Time and Scrubbing Technique
Dwell time is how long the cleaner sits before you scrub. Most people skip this step, and it shows. Give the degreaser 15 to 45 minutes, depending on the product. Keep it wet; do not let it dry out.
The single biggest reason DIY oil removal fails is rushing the dwell time. Let the product sit and the scrubbing gets easier.
Step 4: Pressure Washing Concrete Driveway Oil Stains
Pressure washing oil stains concrete driveway surfaces collect removes loosened oil and leftover residue in one pass, the fastest way to finish, but only after the degreaser has done its work.
Rinsing, Disposal, and Protecting Surface Integrity
Rinse the whole slab with clean water, working toward the street or a drain you can block. Never let oily runoff flow into storm drains or waterways. Sweep up absorbent material and bag it for trash pickup. Check with your local waste office on disposal rules for solvent-soaked rags.
A turbo nozzle is tempting for stubborn stains, but it can carve grooves in concrete. Stick with the 25-degree tip.
Step 5: Seal the Concrete to Prevent Future Stains
This is the step almost every guide skips, and it determines whether you are back out here next month. Cleaning opens the pores of the concrete, and unsealed concrete is a sponge, a single drip from a warm engine can soak in within minutes. Sealing closes those pores so oil sits on top long enough to wipe up.
Penetrating vs. Film-Forming Sealers
There are two families of concrete sealer, and they do different jobs:
| Sealer Type | How It Works | Best For | Trade-Offs |
|---|---|---|---|
| Penetrating (silane/siloxane) | Soaks into the pores and chemically bonds with the concrete | Driveways, garages, any surface that takes traffic | Breathable, no surface film, does not change appearance; needs reapplication every few years |
| Film-forming (acrylic, polyurethane, epoxy) | Lays a protective coating on top of the slab | Showroom floors, decorative concrete, high-stain-risk areas | Stronger stain resistance and a gloss finish; can peel, scuff, or yellow, and is harder to repair |
When to Seal, and When Not To
Wait at least 48 hours after cleaning before sealing, longer in humid or cool weather, the slab must be fully dry. Test by taping a 2-foot square of plastic sheeting to the concrete overnight. If condensation forms underneath, the slab is still releasing moisture and the sealer will not bond.
Do not seal if:
- Rain is forecast within 24 hours
- The slab is new, wait at least 28 days for the concrete to cure
- Temperatures will drop below the sealer manufacturer’s minimum (commonly 50°F)
- The surface still has visible oil residue; sealing over oil traps the stain and prevents future sealer from bonding
Application That Actually Lasts
Apply with a roller or low-pressure sprayer in thin, even coats. Two thin coats outperform one heavy coat every time, a thick coat pools, skins over, and peels. Keep a wet edge to avoid lap marks. Most penetrating sealers need two coats with a few hours of dry time between them; check the label, because formulations vary.
Maintenance and Reapplication
The water-bead test tells you when to reseal: pour a cup of water on the slab. If it beads and rolls off, the sealer is still working. If it soaks in within a minute or two, reapply. For most driveways that is every two to three years, more often in high-UV climates or heavy traffic.
- Choose a penetrating silane/siloxane sealer for driveways
- Apply in mild, dry weather with no rain in the forecast
- Never seal over damp concrete or over an uncleaned stain
- Recheck the finish each spring with the water-bead test
- Reapply before the next winter, not after, de-icing salts and freeze-thaw cycles accelerate wear on an unsealed slab
Sealing is the difference between a driveway you clean once and a driveway you clean every few months. It is the highest-leverage hour you will spend on this job.
When to Hire Professional Pressure Washing Services
Some stains are not worth a weekend of scrubbing. Decades-old oil, large commercial spills, and stains that keep returning usually need professional pressure washing services, as do HOA deadlines, delicate surfaces, and large driveways.
Concrete care guidance from the Portland Cement Association
Common Mistakes to Avoid
Most failed oil removal comes down to a handful of repeat errors:
- Scrubbing a dry stain before applying any cleaner
- Using a wire brush that scratches the concrete
- Letting degreaser dry on the surface
- Pressure washing at full blast on a fan-free tip
- Skipping the sealer after cleaning
- Rinsing oil into a storm drain
Storm drain and runoff rules from the EPA
Frequently Asked Questions
Does WD-40 remove oil stains from concrete?
WD-40 can lift light, fresh oil stains because its solvent base breaks down grease. Spray it directly on the stain, wait a few minutes, then scrub with a stiff bristle brush and rinse. For older or deep-set stains, it works better as a pre-treatment before applying a dedicated concrete degreaser. Always test on a small area first, and keep it away from plants and storm drains since it is not environmentally friendly.
Are oil stains permanent on concrete?
Most oil stains are not permanent, but concrete is a porous surface, so oil penetrates deeply and can leave a shadow even after cleaning. Fresh stains come out with absorbents and degreasers. Stains that have sat for months or years may need repeated treatments, a heavy-duty degreaser, or professional pressure washing. Sealing the concrete after cleaning prevents future oil from soaking in.
What is the strongest degreaser for concrete?
The strongest options are solvent-based or butyl-based degreasers formulated for concrete and masonry. Look for products labeled heavy-duty and safe for porous surfaces. For tough stains, apply the degreaser undiluted, let it dwell 10 to 15 minutes, scrub with a stiff bristle brush, and rinse thoroughly. Always follow the manufacturer’s dilution and safety instructions, and wear gloves and eye protection.
Is it better to use a pressure washer or chemical cleaner for oil stains?
For best results, use both. Start with a chemical degreaser to break down the oil, then use a pressure washer to rinse the residue away. Pressure washing alone can push oil deeper into the concrete if you skip the degreaser. Keep the pressure washer nozzle at a consistent distance and use a fan tip to avoid etching the surface. For delicate or older concrete, consider professional pressure washing services.
Oil stains on a concrete driveway come back when the surface is left unsealed and spills sit too long. Crystal Clear Windows can take that job off your list with professional driveway cleaning, soft washing, and exterior maintenance for homes and businesses. Our team provides free estimates and handles everything from the first rinse to the final seal. Get a quote from Crystal Clear Windows and keep your driveway looking clean year-round.